 |
| A ring printed at the new higher resolution. (I get the Opera House, and Sydney Harbour Bridge, but is that a beer bottle at the back??) |

Friday 28 September 2012
UP! - Grade coming
Some exciting news. PP3DP, the makers of the UP! printers have announced there will be a new version of their software released on the 30th of September. The two major changes will be the ability to print thinner walls than previous, and the one that interests me most, a reduction in layer thickness! The UP! Plus will go from a minimum of 0.2mm to 0.15mm and the new MINI will go from 0.25mm to 0.2mm. I'm sure there will be other changes, but we have to wait a few more days yet....
Tuesday 25 September 2012
Holy lithomania batman!
It turns out that making the picture as a negative yields a much better result!
These are called lithophanes, and used to be made from porcelain, but work equally well in plastic!
I'm using the program Photo to Mesh to lift a 3D picture from a 2D photo. There are a few programs out there that will do the same, but this one was cheap and easy to use. A free demo is available too.
Here are a couple samples I have done. Printed in white plastic .


These are simply held up the light to show the detail. The tops get a little rough because they are printed vertically, and the print tends to wobble around a bit as it gets higher. The thinnest parts are .6mm so its not a surprise.
Here is what the puppy looks like without backlight.

Thursday 20 September 2012
Came across a program called Photo to Mesh that lifts a 3D image from a 2D photo.
Here is the original photo, converted to grey scale.

First print in white. Pity about the lines, but I might be able to reduce them....
 This one is printed in the new Crysta-line clear ABS found here I'm really happy with how this came out. Its printed really thin and allows the light to create a fantastic effect.

Here is the original photo, converted to grey scale.

First print in white. Pity about the lines, but I might be able to reduce them....


Thursday 6 September 2012
Clear update
Here are a couple shots of a 0.8mm thick(this is as thin as my printer will allow) rectangle, one printed at 270C the other at approximately 240C.
The results are not what I expected at all. I had expected the higher temp would produce a clearer print, but it doesn't. It seems to be more crystal like. Strength is about the same for both pieces, which I think is better than other filaments I have used, but I'll hold judgement until I do direct comparisons. Certainly the bare filament takes far more to break from bending than normal.


I also tried sanding a piece with 1200 grit and then rubbing with acetone, but this didn't have any real effect on the transparency, but it did make the layers a little less defined.
The results are not what I expected at all. I had expected the higher temp would produce a clearer print, but it doesn't. It seems to be more crystal like. Strength is about the same for both pieces, which I think is better than other filaments I have used, but I'll hold judgement until I do direct comparisons. Certainly the bare filament takes far more to break from bending than normal.
This first one was printed at ~240C

High temperature 270C

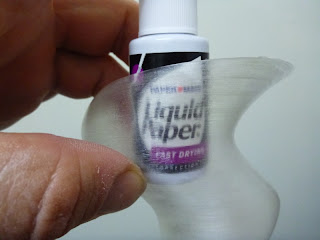
The liquid paper test!

Clearly better ( pun intended)

I also tried sanding a piece with 1200 grit and then rubbing with acetone, but this didn't have any real effect on the transparency, but it did make the layers a little less defined.
Wednesday 5 September 2012
Gone fishing...
My eagerly awaited clear ABS sample arrived today! First thing I thought was they had sent me fishing line! The filament is very smooth and seems like it is of high quality. Measured filament thickness was a very consistant 1.74mm. It was also packaged nicely in a vacuum sealed foil bag.
So how does it print ? It appears to print very well. I've only printed a tornado shaped object, but it came out well with no bubbles and quite transparent. The other thing I noticed was its strength. I'll need to print the same thing in a colour to do a true A/B test, but the walls seemed unusually strong for 0.8mm
How it came.

The fishing line.


The first print.

Transparency.


Subscribe to:
Posts (Atom)