

Sunday 30 December 2012
Blatent macro shot
My macro lens arrived to day! So here is a close up of the Sapphos sculpture printed at .2 mm. Even close up its not easy to make out the layers.
Friday 28 December 2012
Printable spool for Laywoo-D3 filaments.
I designed this spool specifically for the Laywoo-D3 filaments. This one
is actually printed in the Laywoo-D3 filament. Its a little bendy, and I
suggest printing in either ABS or PLA.
I also designed this to be printable on an UP printer (140x140mm) and with no support.
Centre hub is 30mm in diameter. And the arms are adjustable to suit either 1.75mm or 3mm.

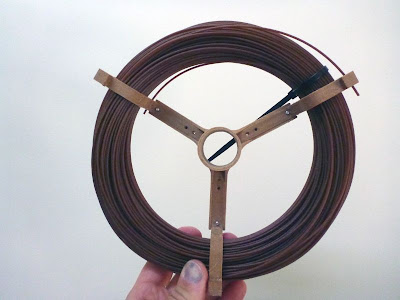
The STL can be downloaded here
I also designed this to be printable on an UP printer (140x140mm) and with no support.
Centre hub is 30mm in diameter. And the arms are adjustable to suit either 1.75mm or 3mm.


The STL can be downloaded here
More fun with wood!

Thursday 27 December 2012
Laywoo-D3 and support
I was asked how Laywoo-D3 prints with support. At that stage I had stuck with mainly models that didn't require support, as I was also quite dubious about how easy support might be to remove. Or how stable it might be during building, as it is quite soft.
I had been printing some Sapphos statues recently and wondered how well it might print in Laywoo-D3.
So here is the result!
I used a flash with these pictures as it highlights the details far better. At least until my new macro lens arrives.


I had been printing some Sapphos statues recently and wondered how well it might print in Laywoo-D3.
So here is the result!
I used a flash with these pictures as it highlights the details far better. At least until my new macro lens arrives.

You can see the support around the base and under the chin. There is also a bit at the back of the head that is not shown. I have been printing in .15mm layers, but thought I would do this in .2mm. The layers are just visable.
Although the support was stuck on well, it did generally come away cleanly.


One issue is the lightening of the areas where support was removed. Although the flash makes it look much worse than it is. I found just wetting my finger and rubbing over the are seem to help. Perhaps a clear coat might be worth a try.
And here is one printed at .15mm in ABS as a comparison.

Friday 21 December 2012
End of the world? Nah, just some really neat coasters!

Thursday 20 December 2012
New kapton tape, new price.
Just received our new shipment of 140mm wide kapton tape.
This lot is thicker than the first batch at .08mm, or just over 3 mil and due to a bulk purchase I have been able to reduce the price from $40 to $29 per 33M roll. That should yeild around 230 platform coverings at about 12.6c per cover.

This lot is thicker than the first batch at .08mm, or just over 3 mil and due to a bulk purchase I have been able to reduce the price from $40 to $29 per 33M roll. That should yeild around 230 platform coverings at about 12.6c per cover.

Wednesday 12 December 2012
Laywoo-D3 update
After a total of around 8 hours of printing with the Laywoo-D3 with no blockages I'm fairly confident that the .5mm nozzle has done the trick. Enlarging the UP nozzle also hasn't seemed to have had a detrimental effect on ABS or PLA printing either!
Something I have learned is this material really likes plenty of air. Very much like PLA in this regard. Otherwise it has a tendency to become quite stringy.
I printed the terracotta warrior again but with maximum fill. This gave a pleasing weight to it. Much more like a real piece of wood, more so than the previous hollow print. The other thing I discovered is that the layer bonding is excellent, and the parts, although they flex a little, are very hard to break.
This is a tornado I printed at .15mm. Its a little furry.

Sunday 9 December 2012
Wooden Warrior!
Well being all out of terracotta.....
My first test a few weeks ago with Laywoo-D3 wasn't so succesful on the UP. The nozzle quickly became blocked after about 15 min. So I abandoned further prints until I could get hold of a .5mm nozzle. In the end I bought some .5mm drill bits and enlarged a spare nozzle I had. Stock size is .4mm I think.
So today I tried printing out a scan of a terracotta warrior I scanned with 123D catch a few months back. The print took around 1 hour 22 min, significantly longer than any other print I had tried. I printed at .15mm layers and minimum fill, to save wood. The 1.7mm wood is rather rare at the moment.
The fact it printed without any blockages is hopefully due to the larger nozzle, but I could have just got lucky. More printing will tell I guess. But I successfully swapped back to ABS without any issues.
The wood is quite stringy, as you can see between the feet, kinda like PLA, but what I love is the wood feel of the object. It really feels like a piece of wood. In this case cardboard, due to being almost hollow. Its quite soft too, but I think it will harden up in a day or so. Also note the layers are almost completely invisible!


Thursday 6 December 2012
Nozzle too cold
There have been quite a few iterations of the "wind barrier" for the UP Plus printer, the latest of which is an adjustable flap to allow you to swap between air blowing over the print and not. The latest printers, so I am told, also have larger fans, which allow for even better cooling. Especially helpful during PLA printing.
Anyway, I've been occasionally getting "Nozzle too cold" errors when having the flap set to full open. It seems like the heater just can't keep up. So I thought I would try and do something to help insulate the element from the blowing air. What I have done is applied ( quite messily) high temperature silicone to the side and bottom of the heater element, but not the nozzle. I also applied it to the heater wires, that have a nasty tendency to break after a while, to help support them.
High temp silicone should be available at most auto parts stores.
So far so good! Even with the flap closed there is a small amount of air that escapes the barrier. This seemed enough to cool my hot end to about 98%. No problem really, its only when it gets to around 93 that it stops printing. So far the temp is reading 100% all the time, with or without the fan blowing on it. The other added benefit is that stray filament doesn't stick all over the heater making a nasty mess.

Subscribe to:
Posts (Atom)